Styling
Each write() call accepts the same style keywords:
foregroundandbackgroundset the colors.- Text modifiers, such as
boldanddim, change how the text looks. borderandborder_styleput a box around the content and set its color.
This guide shows each of them. It also shows how to change a style after you write the content, and how to choose colors that show clearly in all terminal themes.
Colors
You can give a color in three forms:
- A name, such as
'cyan'. - A hex string, such as
'#e8768a'. - A
(red, green, blue)tuple, with each value from 0 to 255.
import xnano

with xnano.new(width=40, height=4) as canvas:
    canvas.write('a named color', foreground='cyan')
    canvas.write('a hex color', foreground='#e8768a')
    canvas.write('a red, green, blue tuple', foreground=(148, 108, 230))
    canvas.write(' on a background ', foreground='black', background='yellow')
    print(canvas.render(format='ansi'))


canvas.write() is the same as canvas.screen.write(), and canvas.render()
is the same as canvas.screen.render().
The names are the 16 colors that every terminal has. Each of the eight normal colors has a light version:
| Normal color | Light version |
|---|---|
black |
dark_gray |
red |
light_red |
green |
light_green |
yellow |
light_yellow |
blue |
light_blue |
magenta |
light_magenta |
cyan |
light_cyan |
gray |
white |
The spelling grey and the prefix bright_, as in bright_red, also work.
'reset' gives the default color of the terminal. If xnano does not know a
color, write() raises a ValueError, and the message shows the forms that
work.
Text modifiers
A text modifier changes how text looks. Each modifier is a keyword of write()
that takes True or False, and the default is False. You can use more than
one modifier at the same time, and you can use modifiers with colors.
import xnano

with xnano.new(width=40, height=6) as canvas:
    canvas.write('bold', bold=True)
    canvas.write('dim', dim=True)
    canvas.write('italic', italic=True)
    canvas.write('underline', underline=True)
    canvas.write('reverse', reverse=True)
    canvas.write('crossed out', crossed_out=True)
    print(canvas.render(format='ansi'))


| Modifier | What it does |
|---|---|
bold |
Makes the text bold. |
dim |
Makes the text less bright. |
italic |
Makes the text italic. |
underline |
Puts a line below the text. |
reverse |
Swaps the foreground color and the background color. |
crossed_out |
Puts a line through the text. |
blink |
Makes the text blink. |
hidden |
Hides the text, but keeps the cells that it uses. |
Some terminals do not show all modifiers. For example, italic needs a font
with italic letters, and some terminals show blink text without the blink.
Change a style later
After you write content, you can change its style through its placement. Each
modifier has a method with the same name, such as bold() or underline().
import xnano

with xnano.new(width=30, height=1) as canvas:
    label = canvas.write('status: ok', foreground='green')

    label.color.fg = 'yellow'  # >> [color]
    label.color.bg = 'black'  # >> [color]
    label.bold().underline()  # >> [chain]
    assert label.is_bold and label.is_underlined  # >> [read]

    label.underline(False)  # >> [off]
    print(canvas.render(format='ansi'))
color.fg is the text color, and color.bg is the background color. They
accept the same forms as foreground and background. 'reset' removes the
color.
A modifier method turns the modifier on. Each method returns the placement, so you can chain the calls.
A property such as is_bold tells you if a modifier is on. You can also set the
property, for example label.is_bold = False.
Give False to turn a modifier off.
The properties are is_bold, is_dim, is_italic, is_underlined,
is_reversed, is_crossed_out, is_blinking and is_hidden.
Reuse a style
A Style keeps colors and modifiers together. Make the
style one time, then give it to each write() call with style=. The first
argument of Style is the foreground color, and the second argument is the
background color. If you also give style keywords to write(), they apply over
the style.
import xnano
from xnano.styles import Style

heading = Style('magenta', bold=True)

with xnano.new(width=40, height=3) as canvas:
    canvas.write('Overview', style=heading)
    canvas.write('Details', style=heading, underline=True)  # >> [over]
    canvas.write('Plain text')
    print(canvas.render(format='ansi'))
underline=True applies over the style, so Details is magenta, bold and
underlined.


Several styles in one line
To give different styles to parts of one line, use a
StyledText. A StyledText is a list of
TextSpan items, and each span has its own text and
style. A span without a style keeps the default style. write() accepts a
StyledText in the same way as a string. This example writes it in a
Paragraph widget, which also wraps long lines.
import xnano
from xnano.styles import Style, StyledText, TextSpan
from xnano.widgets import Paragraph

with xnano.new(width=40, height=2) as canvas:
    line = StyledText(
        [
            TextSpan('✓ ', style=Style('green', bold=True)),
            TextSpan('12 tests passed '),
            TextSpan('in 0.4s', style=Style(dim=True)),
        ]
    )
    canvas.write(Paragraph(line), width='100%')
    print(canvas.render(format='ansi'))


Text from other programs
Many programs print colored text with ANSI escape sequences, for example git,
pytest and logging libraries. To show such text with its colors, read it with
StyledText.from_ansi(), then write the result.
import xnano
from xnano.styles import StyledText

output = '\x1b[32m✓\x1b[0m build \x1b[2m(2.1s)\x1b[0m\n\x1b[1;31m✗\x1b[0m tests: 2 failed'

with xnano.new(width=40, height=3) as canvas:
    canvas.write(StyledText.from_ansi(output))
    print(canvas.render(format='ansi'))


from_ansi() keeps the colors, the text modifiers, the line breaks, the tabs
and the carriage returns. It removes all other escape sequences, for example
the sequences that move the cursor. write() does not read escape sequences in
a plain string, so use from_ansi() for text that has them.
write() puts a StyledText in the same place as a string with the same
keywords. Alignment, borders and wrapping also work as they do for a string. To
change a line after you write it, set the text of its placement to a new
StyledText or a string. The new text replaces the old text, also when the
write gave colors or a border. The colors and modifiers of the placement apply
over the styles of the spans.
import xnano
from xnano.styles import StyledText

with xnano.new(width=30, height=3) as canvas:
    status = canvas.write('building', border='rounded')
    line = '\x1b[32m✓\x1b[0m build \x1b[2m(2.1s)\x1b[0m'
    status.text = StyledText.from_ansi(line)  # >> [styled]
    assert status.text == '✓ build (2.1s)'  # >> [plain]
    assert status.width == 16
    print(canvas.render(format='ansi'))
The placement shows the new text with its colors, in the same border. It changes its size to fit the text, as it does for a string.
When you read text, you get only the characters, without the styles.
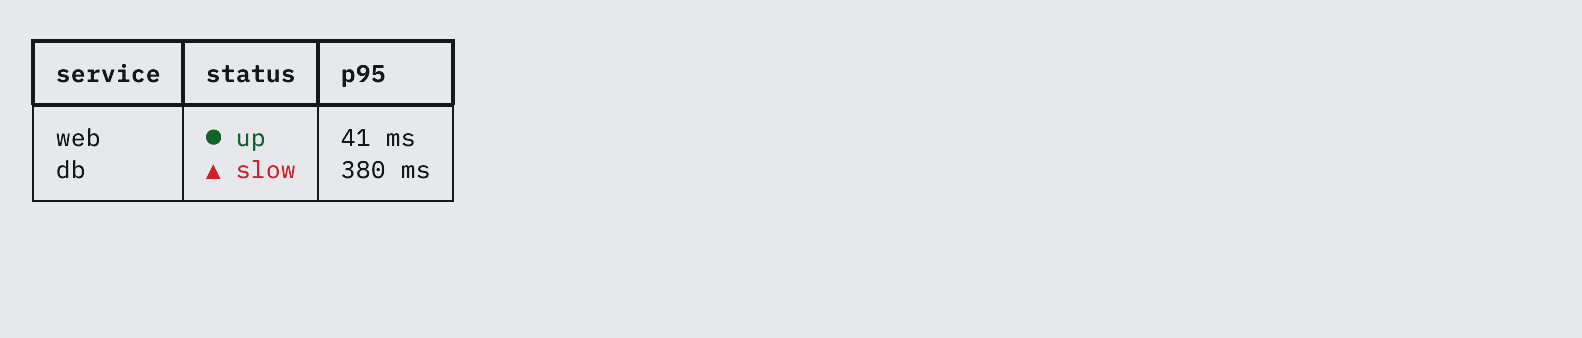
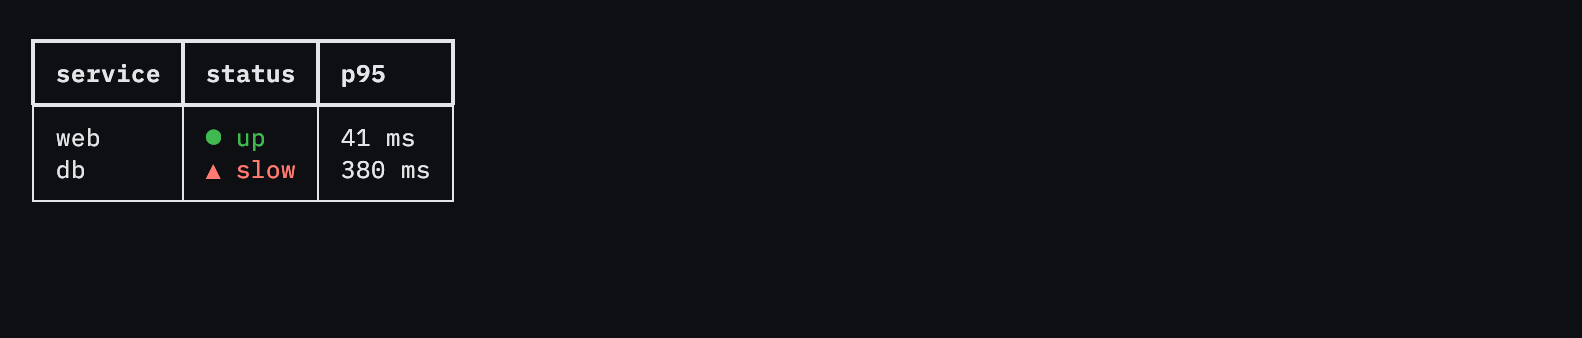
Rich draws tables, panels, syntax highlighting
and Markdown. To write something that rich draws, give it to
xnano.from_rich(). Rich draws it at the size of its
placement, and draws it again when that size changes. Install rich to use it,
with pip install rich.
import xnano
from rich.table import Table

table = Table('service', 'status', 'p95')
table.add_row('web', '[green]● up[/green]', '41 ms')
table.add_row('db', '[red]▲ slow[/red]', '380 ms')

with xnano.new(width=40, height=7) as canvas:
    canvas.write(xnano.from_rich(table), width='100%')
    print(canvas.render(format='ansi'))
If you change a renderable after you write it, call refresh() on its
placement to draw it again. For example, do this after you add a row to a table.
To show data that changes by itself, make the renderable in a
writable component. xnano runs the component again when a
value that it reads changes, for example the clock:
import xnano
from rich.table import Table


@xnano.writable
def uptime(context: xnano.Context) -> xnano.styles.RichContent:
    table = Table('uptime')
    table.add_row(f'{context.clock.elapsed_seconds:.0f} s')
    return xnano.from_rich(table)


with xnano.open(height=6) as terminal:
    terminal.write(uptime, width=20)
    terminal.run(stop_on='q')
A placement of rich content is the same as other placements. It takes a
position, a size, a border, a layer and effects. Its foreground and
background apply over the colors of rich, as they do over styled text.
Rich uses the size of the placement:
- Without a
width, rich uses the natural width of the renderable, but not more than the width of the canvas. Rich measures the renderable again each time that it draws it. Thus, a table becomes larger when it gets more rows. - If you give a
height, rich gets it. Without aheight, arich.layout.Layoutfills the height of the canvas. - If a component runs on each frame, give it a
widthwhen you write it. Then rich does not measure the renderable on each frame.
Rich reads the time from the clock of the canvas. Thus, a rich.spinner.Spinner
moves by itself, and it stops while the clock is paused. A
rich.progress.Progress has its own clock. To make it follow the clock of the
canvas, give it get_time=lambda: canvas.clock.elapsed_seconds.
import xnano
from rich.spinner import Spinner

with xnano.new(width=20, height=1) as canvas:
    canvas.write(xnano.from_rich(Spinner('line', 'working')))
    assert canvas.render().startswith('- working')
    canvas.clock.step(delta_seconds=0.2)  # >> [step]
    assert canvas.render().startswith('\\ working')
Moves the clock of the canvas 0.2 seconds forward. The spinner shows its next frame. On a terminal, the clock moves by itself.
xnano draws a string as rich.print draws it, with markup, emoji codes and
highlighting. To draw text without them, give a rich.text.Text. Some parts of
rich show differently in xnano:
- A link keeps its text, but not its address.
- Frame, circle and overline styles show as plain text.
- xnano does not draw control codes, for example the codes that move the cursor.
If rich raises an error while it draws, xnano does not change the error. On
Python 3.11 and later, a note on the error names from_rich(). The
RichContent reference gives more information.
Borders
border sets the kind of line. border_style takes a Style for the border
only, so the border can have a color that is different from the text.
Writing Content shows the kinds of line, title and
padding.
import xnano
from xnano.styles import Style

with xnano.new(width=40, height=3) as canvas:
    canvas.write(
        'all systems normal',
        border='rounded',
        border_style=Style('green'),
        title='status',
        padding={'horizontal': 1},
    )
    print(canvas.render(format='ansi'))


Themes
A theme gives a whole canvas its colors: the background, text, borders and
widgets. Pass the name of a theme to xnano.new() or xnano.open().
import xnano

with xnano.new(width=30, height=4, theme='xnano-night') as canvas:
    canvas.write('Build 142', bold=True)
    canvas.write('passed', dim=True)
    canvas.write('details', x='right', y=0, border='rounded')
    print(canvas.render(format='ansi'))
Under a theme, plain text gets the text color, dim text gets the secondary
color, and a border gets the border color. A widget gets the accent color for
what is chosen or filled. A color that you give stays as you gave it.
write() takes theme= too, for one placement in other colors.
import xnano

with xnano.new(width=30, height=2, theme='xnano-night') as canvas:
    canvas.write('night')
    canvas.write('day', theme='xnano-day')
    assert canvas.theme == 'xnano-night'
Without a theme, a program uses the colors of the terminal. That is the default,
and it is the best choice for a program that must fit every terminal.
ThemeName lists the themes and their authors.
Choose colors for all themes
People use terminals with light themes and with dark themes, and each theme has its own shade for each named color. These rules keep a program easy to read in all themes:
- Use named colors and
dimfirst. Named colors follow the theme of the user. xnano sends a hex color or a tuple color as it is, so it can be almost invisible on a light or a dark background. Use exact colors only when the color is the content, for example in art and gradients. - Give one meaning to each color. Use green for success, yellow for a warning, red for an error, and blue or cyan for information. Use the same meanings everywhere in the program.
- Do not use color as the only sign of a meaning. Some people cannot see
the difference between red and green, and some terminals show no color. Put a
word or a symbol with the color, for example
● onlineor▲ slow. - Show importance with weight, not with size. A terminal has one text size.
Make titles and keys
bold, keep content plain, and make hintsdim.